Showing posts with label Windows 7. Show all posts

Monday, June 26, 2017

Oracle Workflow Client Installation on Windows 10


When we try to install Oracle Workflow Client Release 2.6.3.5 on Windows 10 (or Windows 7, 8), the Oracle Universal Installer may fail to load.

Checking operating system version: must be 4.0, 5.0, 5.1 or 5.2. Actual 6.2 Failed

Or even after you install, the Workflow Builder may fail to launch.


Error Accessing the System Registry
To fix this, follow the steps below:

1. Download Oracle Workflow Client
2. Extract the zip file - OWF_Clt_2635_WINNT.zip
3. Go to install folder
4. Right click on setup.exe in wfclient2635 > install and open properties
5. Check the checkboxes against Run this program for compatibility mode, and Run this program as administrator 
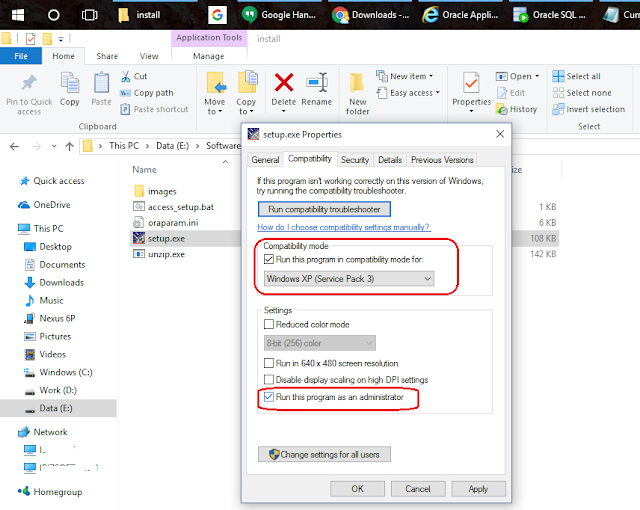

7. Now run the setup.exe as administrator


8. Complete the installation process in Oracle Universal Installer


9. Now the application should run without any issues. Make sure to run it as administrator.


Tuesday, June 21, 2011

Block websites in windows

Internet allow access to plenty of stuffs with few click of a mouse, this includes few things which you don’t want your kids to get access to. Many applications are available to block websites temporarily on a computer but that cost money and are little complicated to operate. Windows gives you an easy and free option to block few websites you want.
You can block websites you want through the following steps by editing windows host file.
  • Open Notepad (Run as administrator)
  • Open the following path C:\Windows\System32\drivers\etc
  • Select All Files in dropdown list to open the file hosts
  • Enter the website you want to block at the bottom in a new line as follows
127.0.0.1 www.facebook.com
127.0.0.1 www.google.com and save it
image
  • You can’t access these websites in any browser until you remove them from the hosts file.

Monday, June 20, 2011

Disable Search History in Windows 7


Windows 7 automatically saves all the recent searches done by the users. The last three searches become visible under the search box as you start typing in it. 
There is a way in which you can disable search history display in Windows 7. But you cannot disable search history display in Windows 7 Home editions. Because you need to utilize the Group Policy Editor for this and it is not available in the Home versions. 
Follow these steps to disable search history display in Windows 7.
v  Enter gpedit.msc in the search box of the Start menu and press Enter.
v  Goto User Configuration > Administrative Templates > Windows Components > Windows Explorer.
v  Double click on Turn off display of recent search entries in the Windows Explorer search box.
v  Select Enabled
v  OK

Now the search history won't be displayed in the search box


Saturday, June 18, 2011

Hidden wallpapers and themes in Windows 7


When you first install Windows 7, it asks for your language, time and currency. Based on your responses, it installs a set of wallpapers and themes. If you choose English (US) for your time and currency format, for example, the available desktop backgrounds and themes will include a United States section with scenery from locations such as Maine, the Southwest and so on.


There are hidden background scenery and themes from other English-speaking countries like Australia, Canada, Great Britain and South Africa. 

Normally, you can't access those backgrounds or themes, but there is a simple way you can install and use them:

Ø  In the search box in the Start menu, type C:\Windows\Globalization\MCT and press enter.

Ø  Windows Explorer will launch and show you a list of subfolders:
MCT-AU, MCT-CA, MCT-GB, MCT-US, and MCT-ZA. Each subfolder has wallpapers for a specific country: AU for Australia, CA for Canada, GB for Great Britain, US for the United States, and ZA for South Africa.

For any of the countries whose wallpaper and themes you want to use, go into its Theme folder, for example, C:\Windows\Globalization\MCT\MCT-ZA\Theme. Double-click the theme.

Ø  That will install a shortcut to the theme and wallpapers in the Personalization section of Control Panel.
You can now use them as you would any other theme or background, by right-clicking the desktop, choosing Personalize, and choosing a background or theme. They will be listed in their own section.

Saturday, January 1, 2011

Secret Items in Send To Menu

      When you right-click on a file you will find only few default items in Send To Menu. In Windows 7 there is a simple trick to see the secret items in Send To Menu.


To View the Secret Items:
  •  Hold down the Shift key while right-clicking on the file, and see the Send To menu. You can find all sorts of extra options.
  • If you want any of those to show up normally without holding down the Shift key, you can create shortcuts in the Send To folder.Just type the following into the Address bar, shell:sendto
  • And then drag shortcuts to your preferred folders into this folder.

Wednesday, December 29, 2010

Some Windows Tips

Your Name on Taskbar
  • Right click Taskbar > Toolbars > New Toolbar
  • Make a new Folder and name it with your name
  •  Now you have your name in the Taskbar
  • You can also hide that folder by going to properties and check hidden.

    Notepad
    • Open Notepad
    • Type ''.LOG" without quotes
    • Save and close the document
    • Open the document again... You will see current date and time...!!!

    Friday, November 26, 2010

    Windows 7 Tips

    Window Management


  • Win+Left Arrow and Win+Right Arrow dock;

  • Win+Up Arrow and Win+Down Arrow maximizes and restores / minimizes.


  • Globalization
    There are several sets of themed wallpapers installed based on the language you choose, but the others are in a hidden directory. Simply browse to C:\Windows\Globalization\MCT and you’ll see a series of pictures under the Wallpaper directory for each country. Just double-click on the theme file in the Theme directory to display a rotation through all the pictures for that country.

    Rearranging the Furniture
    The icons in the new taskbar aren’t fixed in-place. You can reorder them to suit your needs, whether they’re pinned shortcuts or running applications. What’s particularly nice is that once they’re reordered, you can start a new instance of any of the first five icons by pressing Win+1, Win+2, Win+3 etc.

    Quick Launch Toolbar

  • Right-click the taskbar, choose Toolbars / New Toolbar

  • In the folder selection dialog, enter the following string and hit OK: %userprofile%\AppData\Roaming\Microsoft\Internet Explorer\Quick Launch

  • Turn off the “lock the taskbar” setting, and right-click on the divider. Make sure that “Show text” and “Show title” are disabled and the view is set to “small icons”.

  • Use the dividers to rearrange the toolbar ordering to choice, and then lock the taskbar again.


  • Peeking at the Desktop
    Just press Win+Space

    Specialized Windows Switching
     Another feature that power users will love is the ability to do a kind of “Alt+Tab” switching across windows that belong to just one application.

    Focus to Taskbar
    Press Win+T to move the focus to the taskbar. Once you’re there, you can use the arrow keys to select a particular window or group and then hit Enter to launch or activate it.

    Explorer from “My Computer”
     To change the default starting directory for Windows Explorer so that it opens at the Computer node, navigate to Windows Explorer in the Start Menu (it’s in the Accessories folder). Then edit the properties and change the target to read:
     %SystemRoot%\explorer.exe /root,::{20D04FE0-3AEA-1069-A2D8-08002B30309D} 
    If you want the change to affect the icon on the taskbar, you’ll need to unpin and repin it to the taskbar so that the new shortcut takes affect. It’s worth noting that Win+E will continue to display the documents library as the default view.

    Friday, November 19, 2010

    Top Hidden Features in Windows 7

     Windows 7 has its own hidden treasures. And you can access all of those listed here without downloading anything extra. Read on for handy and largely undocumented items in Windows 7 that you probably weren’t aware of..


    Ø   God Mode
       Windows 7’s God Mode is indeed omnipresent. It conveniently puts hundreds of settings from all around the operating system all in
    one place. 
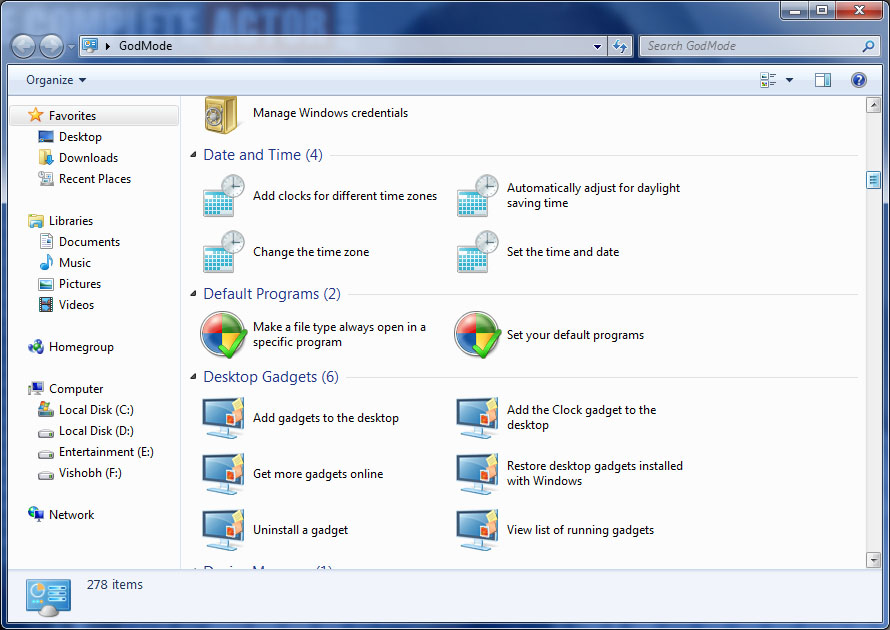
         To turn on God Mode, create a new folder on your desktop, or anywhere you’d like, and name it: GodMode.{ED7BA470-8E54-465E-825C-99712043E01C}
         The resulting folder will contain 270 items, representing virtually every configurable option in Windows 7.

    Ø   Enhanced Calculator


      Windows 7’s calculator has a few extra tricks up its sleeve, which you’ll find under the View menu. It can do myriad unit conversions (temperature, weight, area), and even mortgage

    payment or car mileage calculations. It maintains a history of your previous calculations as long as the program is open.


    Ø   WordPad's File Support


      The built-in WordPad word processor in Vista is of limited usefulness because it only supports RTF (Rich Text Format) and plain text (TXT) files. In Windows 7, on the other hand,  WordPad isn’t quite as restricted. Although Windows 7’s WordPad still doesn’t work with .doc files from Microsoft Word 2003 and earlier versions, it can open and save ODT (Open Document Text) files used by the free OpenOffice.org word processor as well as .docx files created in Microsoft Word 2007 or 2010. Although WordPad can’t understand all the complex formatting (it will warn you of this upon opening or saving a file), it will still let you read the documents without having the native programs installed.


    Ø   Reliability Monitor


      When your system is acting flaky and you’re trying to figure out what’s going on, the Reliability Monitor may help. Search for “reliability” from the Start menu, and run View Reliability History. You’ll get a graph of your system’s “stability index” over a period of days and weeks (rated on a scale of 1 to 10). 


      It displays which programs, Windows components, or miscellaneous items crashed on a given day, helping you identify problem items.

    Ø   Problem Steps Recorder
    When you need outside PC help, it’s much better to let them see for themselves what’s happening on your system. But if remote access isn’t an option, the Problem Steps Recorder may be the next best thing.


    Search for and run psr from the Start menu. Click Start Record, and the utility will record your activities through a series of screen shots, automatically including captions that show exactly where you clicked. You can also use the Add Comment button to highlight specific areas of the screen and insert custom annotations. When you stop recording, everything will be stitched together and saved as a Web browser-compatible MHTML (MIME HTML) file, conveniently pre-ZIPped and ready for e-mailing to your geek of choice.

    Ø   Power Efficiency Report
      If your Windows 7 laptop isn’t getting the battery life you expect, or it experiences power-related issues, such as the inability to go into standby or hibernate mode, the problem usually lies with incorrectly configured power-management settings. Windows 7’s Power Efficiency Report can help you sniff out potential problems. 


      Type search for CMD from the Start menu, run it as an administrator (right-click cmd.exe on the menu and choose Run as administrator).
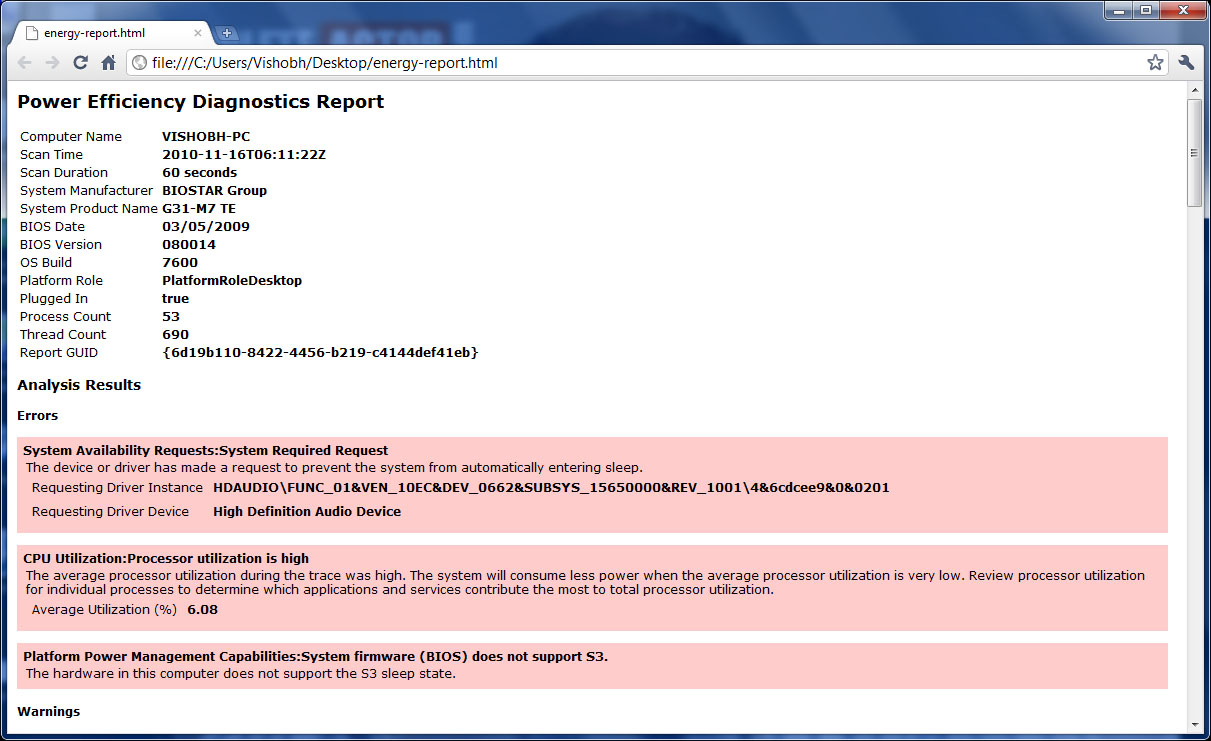
      From the command prompt, type powercfg -ENERGY (include the space) to scan your system, and after about a minute, you’ll find a file called energy-report.html in your \windows\system32 folder.
      Copy the report to another location and open it (you’ll get a file-not-found error if you try to open it from the system32 folder) for detailed information about what system devices or settings are throwing a monkey wrench into your power management.

    Ø   Pin Folders To Taskbar
      You can right-click your favorite programs and pin them to the Windows 7 Taskbar for easy access. There’s no such option for folders, but you can still keep them close at hand on the Taskbar. Rightclick any folder, drag it to an empty space on the Taskbar (or to the Windows Explorer button), and let go when Pin to Windows Explorer appears. Now when you right-click the Windows Explorer button, your folders will be accessible via the Jump List.

    Ø   Wipe Free Disk Space
      When you delete files or folders in Windows, they’re not actually erased; the space they took up is simply marked as “available for use,” which allows the files to be recoverable until they’re overwritten with new data. There is a utility built into Windows (even XP Pro and vista) that will overwrite all the free space on a hard drive, insuring any files you’ve deleted stay dead. 
      Launch a command prompt and type cipher /w:X (X is the letter of the drive or partition you want to wipe). be patient; the process can take a long time if you have a lot of free space.